Self-hosting with a public domain

Hosting multiple services by yourself on a homelab NAS is fun. But at some point, the port numbers stop being convenient. Immich is 2283, Jellyfin is 8096, Portainer lives on 9443, Cockpit is on 9090, and every new service added to the stack is one more number to keep track of. We want the services to have human-readable names. Similar to how Google Photos is on photos.google.com, we want something like https://immich.example.com for our self-hosted version of Google Photos.
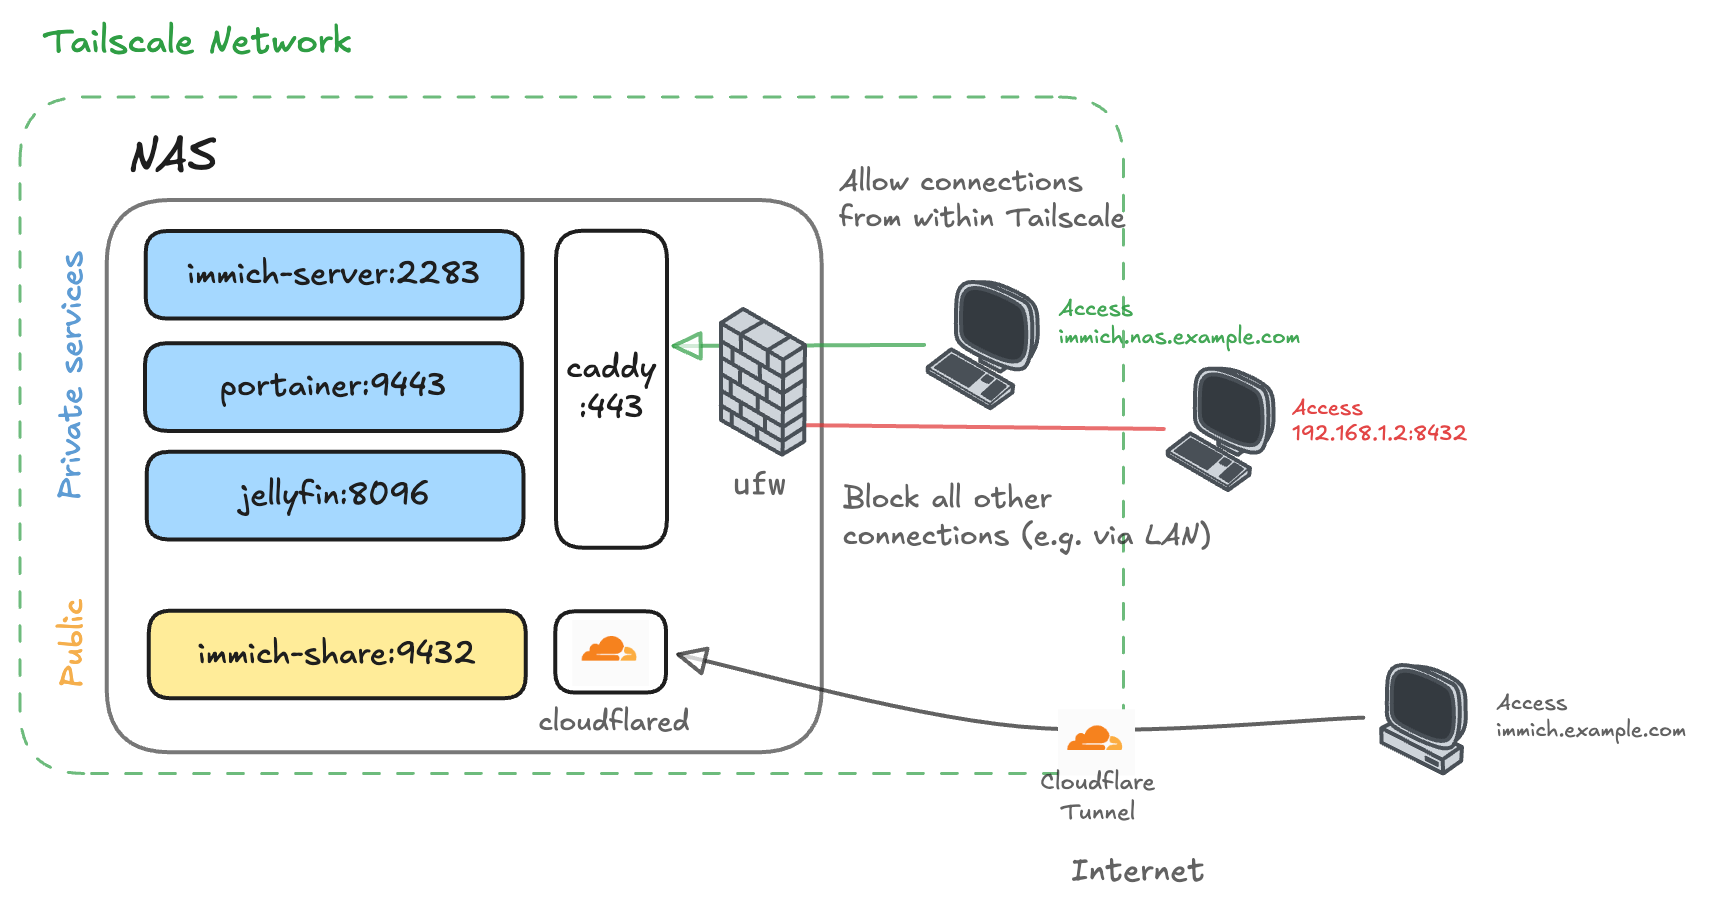
After this post, you can put your services behind a proper domain, so they live at addresses like https://immich.serv.example.com instead of a host-port pair. Even though the domain name is public, this assumes you are already using Tailscale or a VPN, so the service is only accessible (routable) within your own network. Toward the end, this guide also covers how to publish one specific service for access from the public internet using Cloudflare Tunnel.
1. Setup at a glance
This guide assumes the following is already in place:
- A domain managed on Cloudflare
- A NAS joined to a Tailscale network, at IP
100.115.x.x - Services already running in Docker, managed through Portainer or
docker compose
The guide adds the following:
- A DNS on Cloudflare pointing
*.serv.example.comto the Tailscale IP - A Caddy reverse proxy running on one
80/443port, bound to the Tailscale interface, obtaining TLS certificates via Cloudflare DNS-01 challenge
Throughout this guide, replace example.com as your real domain and 100.115.x.x as the NAS’ Tailscale or VPN IP.
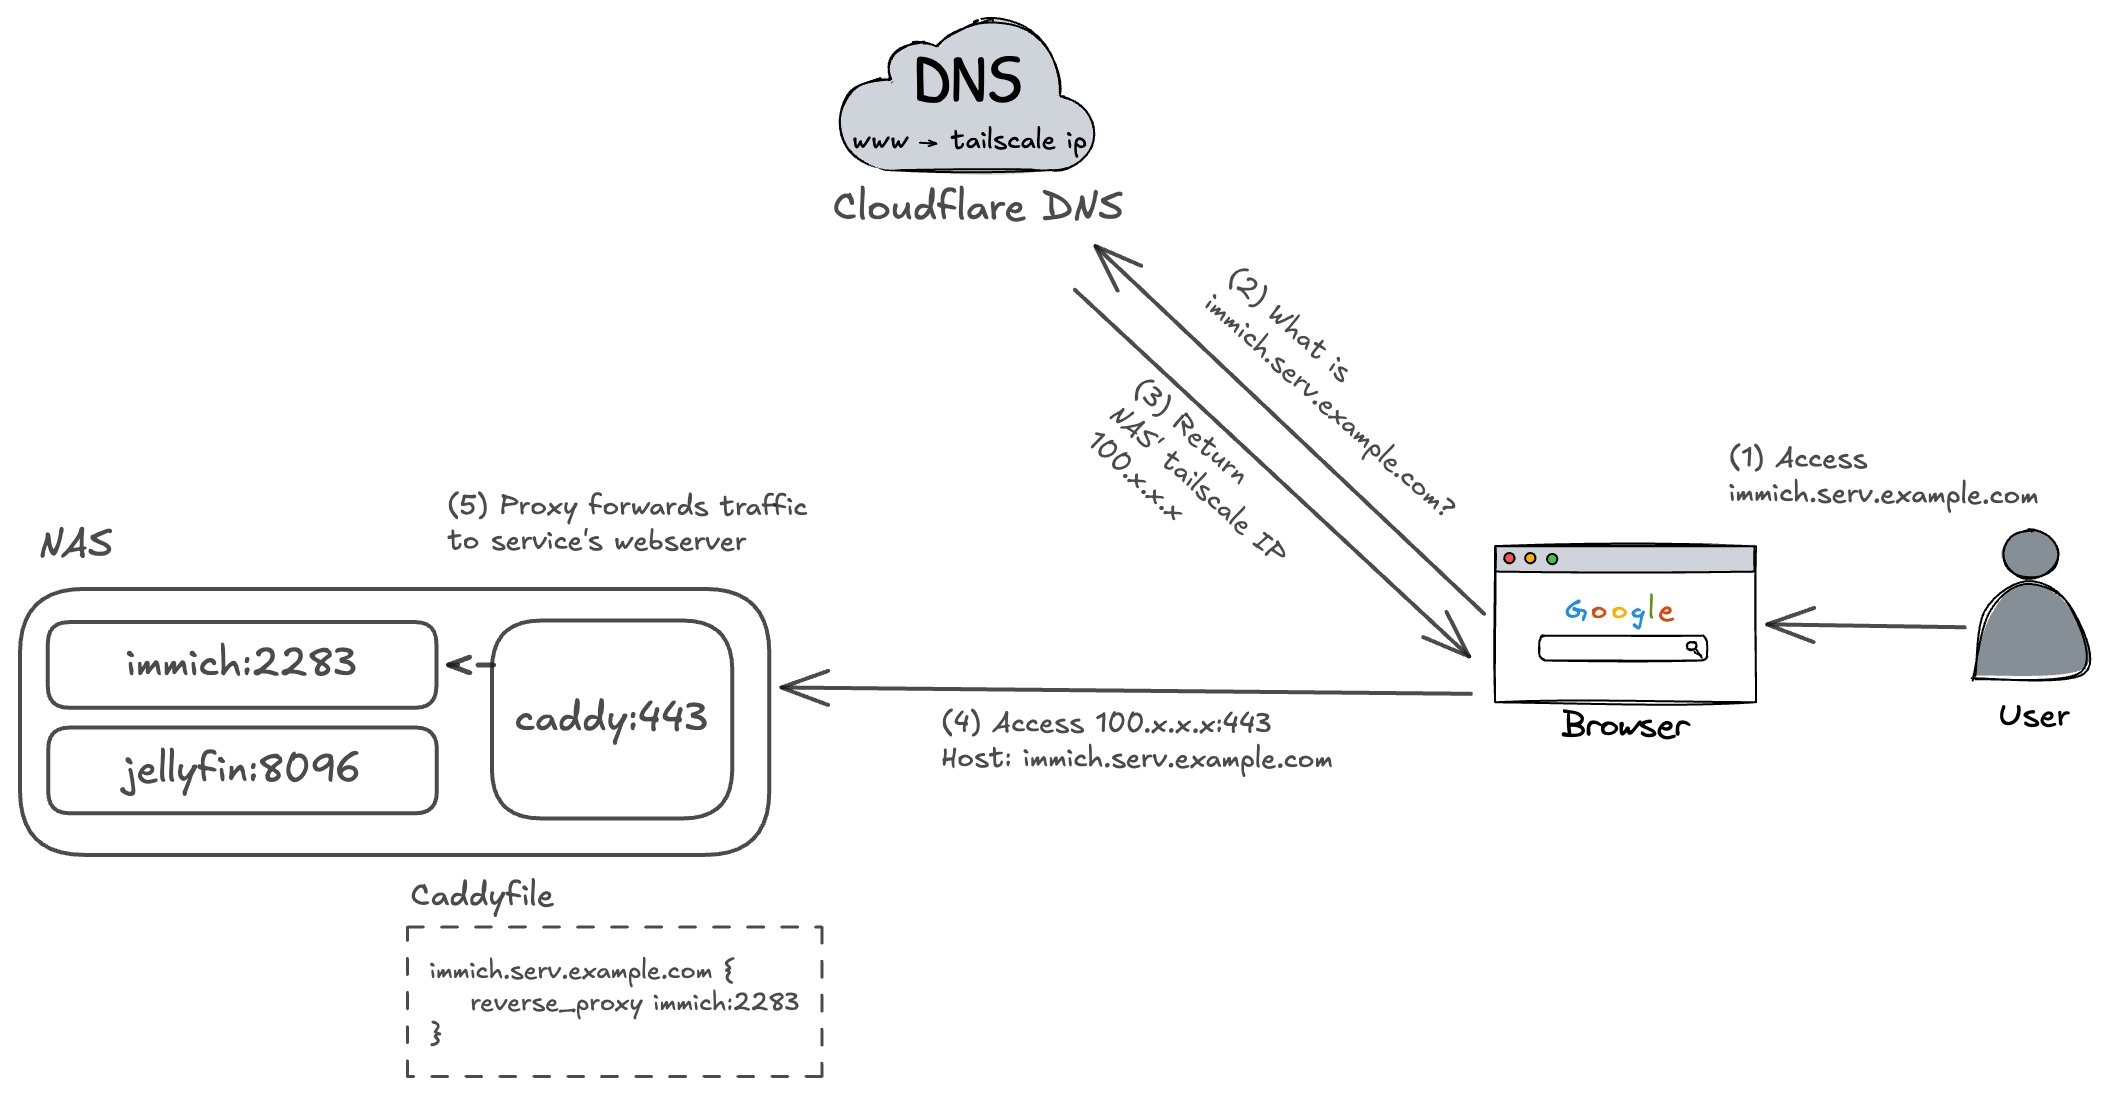
Cloudflare DNS answers queries for *.serv.example.com with the NAS’ Tailscale IP. Cloudflare is acting purely as an authoritative DNS server here and is not proxying any traffic.
Caddy runs on the NAS, listens only on the Tailscale interface, and acts as a reverse proxy that routes incoming requests to the appropriate service container. Caddy also automatically registers TLS certificates for your domains through Cloudflare’s DNS-01 challenge.
2. Setting it up
2.1. DNS record on Cloudflare
Wildcard DNS. Assume your domain is example.com. The obvious approach is to assign individual subdomains like immich.example.com and portainer.example.com to the respective services. However, this requires a new DNS entry for every service added. A wildcard record like *.serv.example.com makes it more convenient since Cloudflare only needs to know about one record, we can handle the routing to each service in Caddy later on. Immich lives at immich.serv.example.com, Portainer at portainer.serv.example.com, and so on. Another benefit is that the full list of internal services never appears as individual DNS records visible to the public.
To do this, we only need to create a single *.serv record on Cloudflare DNS that points to your server’s Tailscale or VPN IP address.
First, get the NAS’ Tailscale IPv4 address:
|
|
In Cloudflare, create a single wildcard A record under the domain:
| Field | Value |
|---|---|
| Type | A |
| Name | *.serv |
| IPv4 address | 100.115.x.x |
| Proxy status | DNS only |
After waiting for DNS propagation, on a machine that has set 1.1.1.1 as the DNS server, any hostname under serv.example.com should resolve to the same Tailscale IP:
|
|
The names resolve at this point, but the NAS has no logic yet for routing requests to the right service based on hostname. That is what Caddy handles.
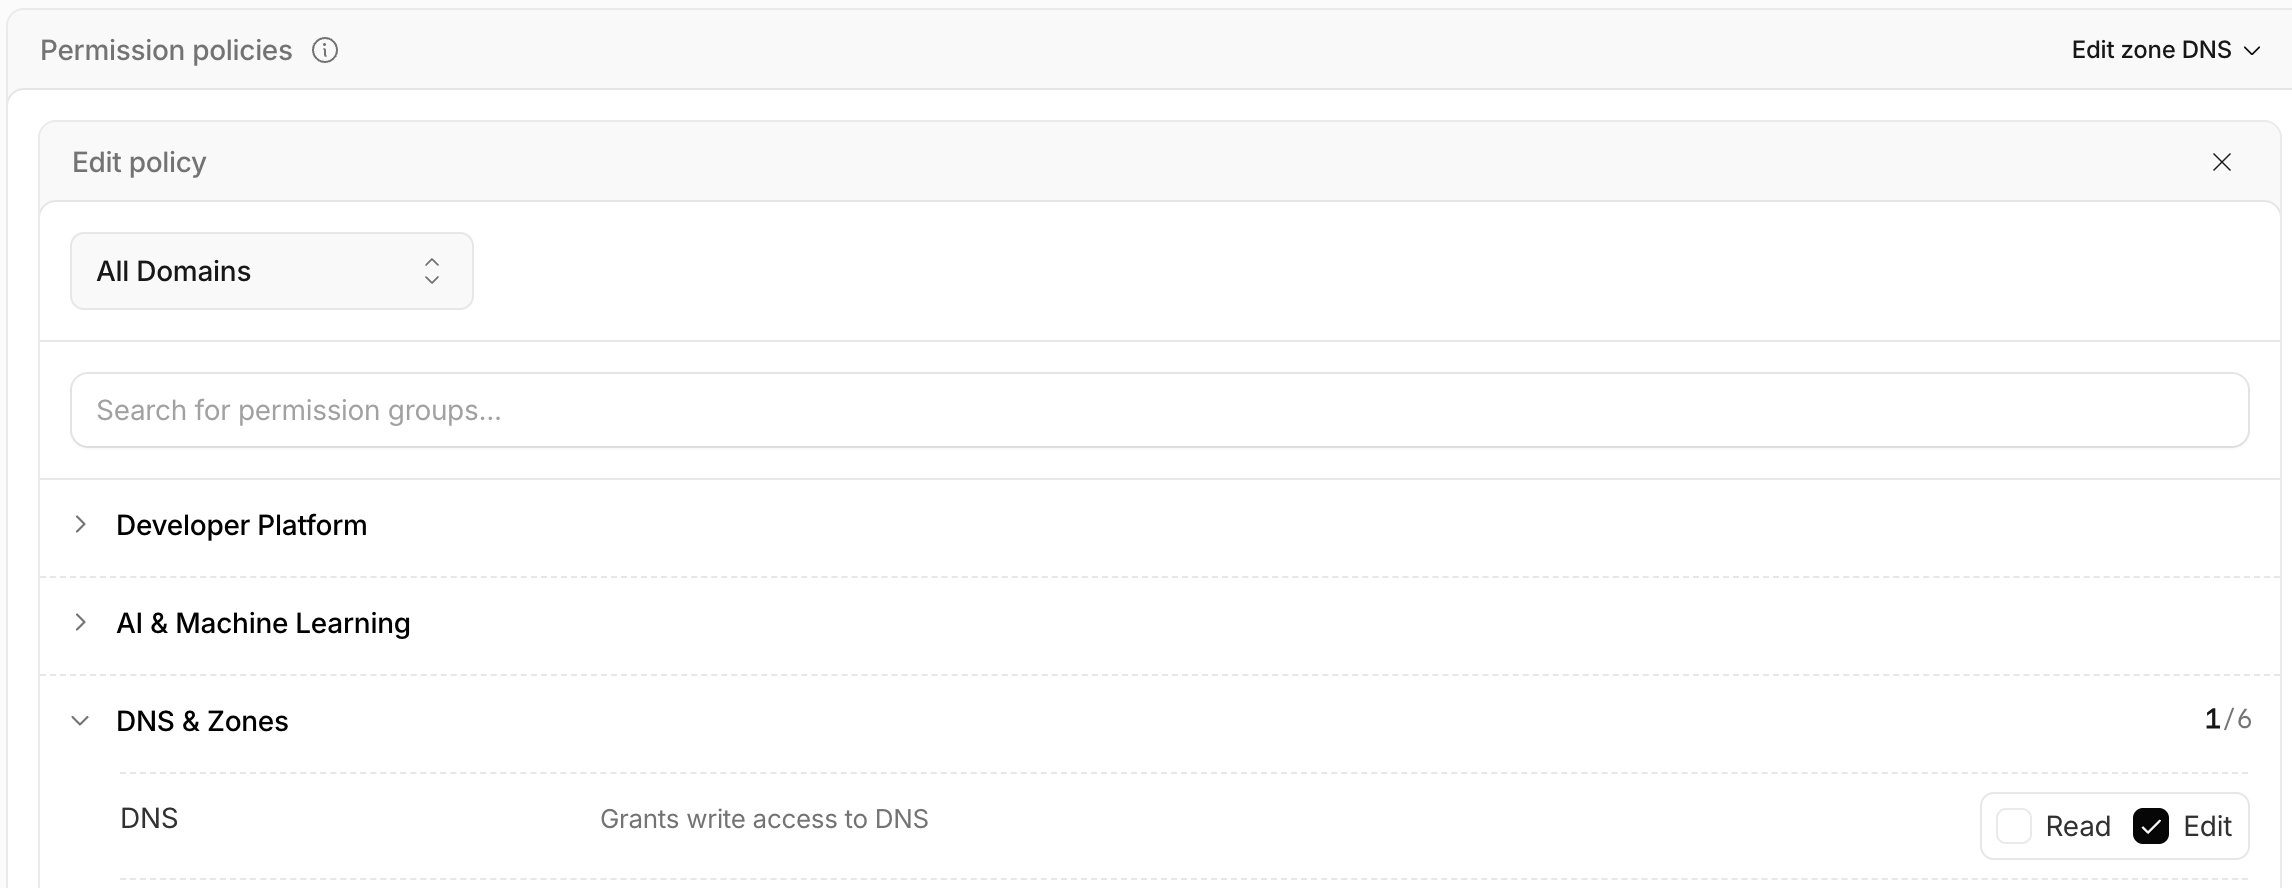
After this, also create a Account API token from Cloudflare’s dashboard, with the Edit permission to DNS.
2.2. Caddy as the reverse proxy
This part sets up Caddy to route the requests that all come to yournas:443 (HTTPS) to individual services’ webserver.
Caddy needs the Cloudflare DNS module for certificate issuance, since the standard upstream image does not ship with third-party modules included. The module needs to be compiled in, which means building a custom image.
The Dockerfile for this image is:
|
|
I personally put the configuration of all services on the NAS to /opt/services/<service name>/. For this Dockerfile, let put it in /opt/services/caddy/Dockerfile.
Compose stack
The Docker Compose stack for Caddy is:
|
|
network_mode: host is required so Caddy can bind to the tailscale0 interface on the host. With Docker’s default bridge networking, Caddy would only see the bridge network and would have no access to the host’s network interfaces. CF_API_TOKEN is your Cloudflare Accounts API token.
Caddyfile
Caddyfile is the main configuration file for Caddy. To match with the stack, save it at /opt/services/caddy/Caddyfile.
First, define a global tailscale_only snippet:
|
|
bind {env.TAILSCALE_IP} restricts the listening socket to the Tailscale interface address only, so Caddy does not accept connections arriving on other interfaces, such as when accessing the services directly through LAN. Note that env.TAILSCALE_IP and env.CF_API_TOKEN are configured in the Docker Compose file.
For each service, configure:
|
|
This assumes Immich and Jellyfin both publishes their port into the host port 2283 and 8096, respectively. Start the Caddy stack and allow some time for the DNS-01 challenge to settle. Check caddy’s log in the meantime: docker logs -f caddy.
After everything completes, you can now go to your web browser and access https://immich.serv.example.com.
Host: immich.serv.example.com header. Caddy reads this header and matches it against the hostname blocks in the Caddyfile, then forwards the request to whichever reverse_proxy target that block specifies, despite the fact that all requests are sent to the NAS’s port 443 (HTTPS).Special case: Portainer
By default, modern versions of Portainer serve traffic over HTTPS on port 9443 using a self-signed certificate. The configuration block for Portainer in the Caddyfile should be:
|
|
As of the latest Portainer version on July 5th, 2026, you will also have to restart Portainer with the --trusted-origins flag:
|
|
Special case: Cockpit
Cockpit also serves on HTTPS by default due to its sentitive nature. You have to first enable serving via HTTP and add your domain as a trusted origin. Create /etc/cockpit/cockpit.conf with the following content:
|
|
The Caddyfile block for Cockpit is similar to any other services.
2.3. Firewall (optional)
There is a quirk that if you publish a container’s port, it still ends up being reachable from all interfaces regardless of ufw configuration. We can resolve this by binding published ports to the loopback address for services that should only be accessed through Caddy:
|
|
Caddy still reaches the service at localhost:2283, while the LAN interface no longer has anything listening on that port. UFW then handles the broader interface-level policy.
|
|
3. Bonus: Publishing a service publicly
The setup above keeps everything inside the Tailnet/VPN. There are cases, though, where you want to publish an application to the public internet. For example, I want to publish immich-public-proxy. This is a small application that publishes Immich’s image sharing endpoint through a different path without exposing your original Immich instance. The “real” Immich still lives at immich.serv.example.com behind the VPN, while this application will now live at immich.example.com on the public internet. Note that this bypasses Caddy and you don’t need edit any of Caddy’s configuration.
After setting up the application that you want to publish, head to Cloudflare Dashboard and open Networking > Tunnels.
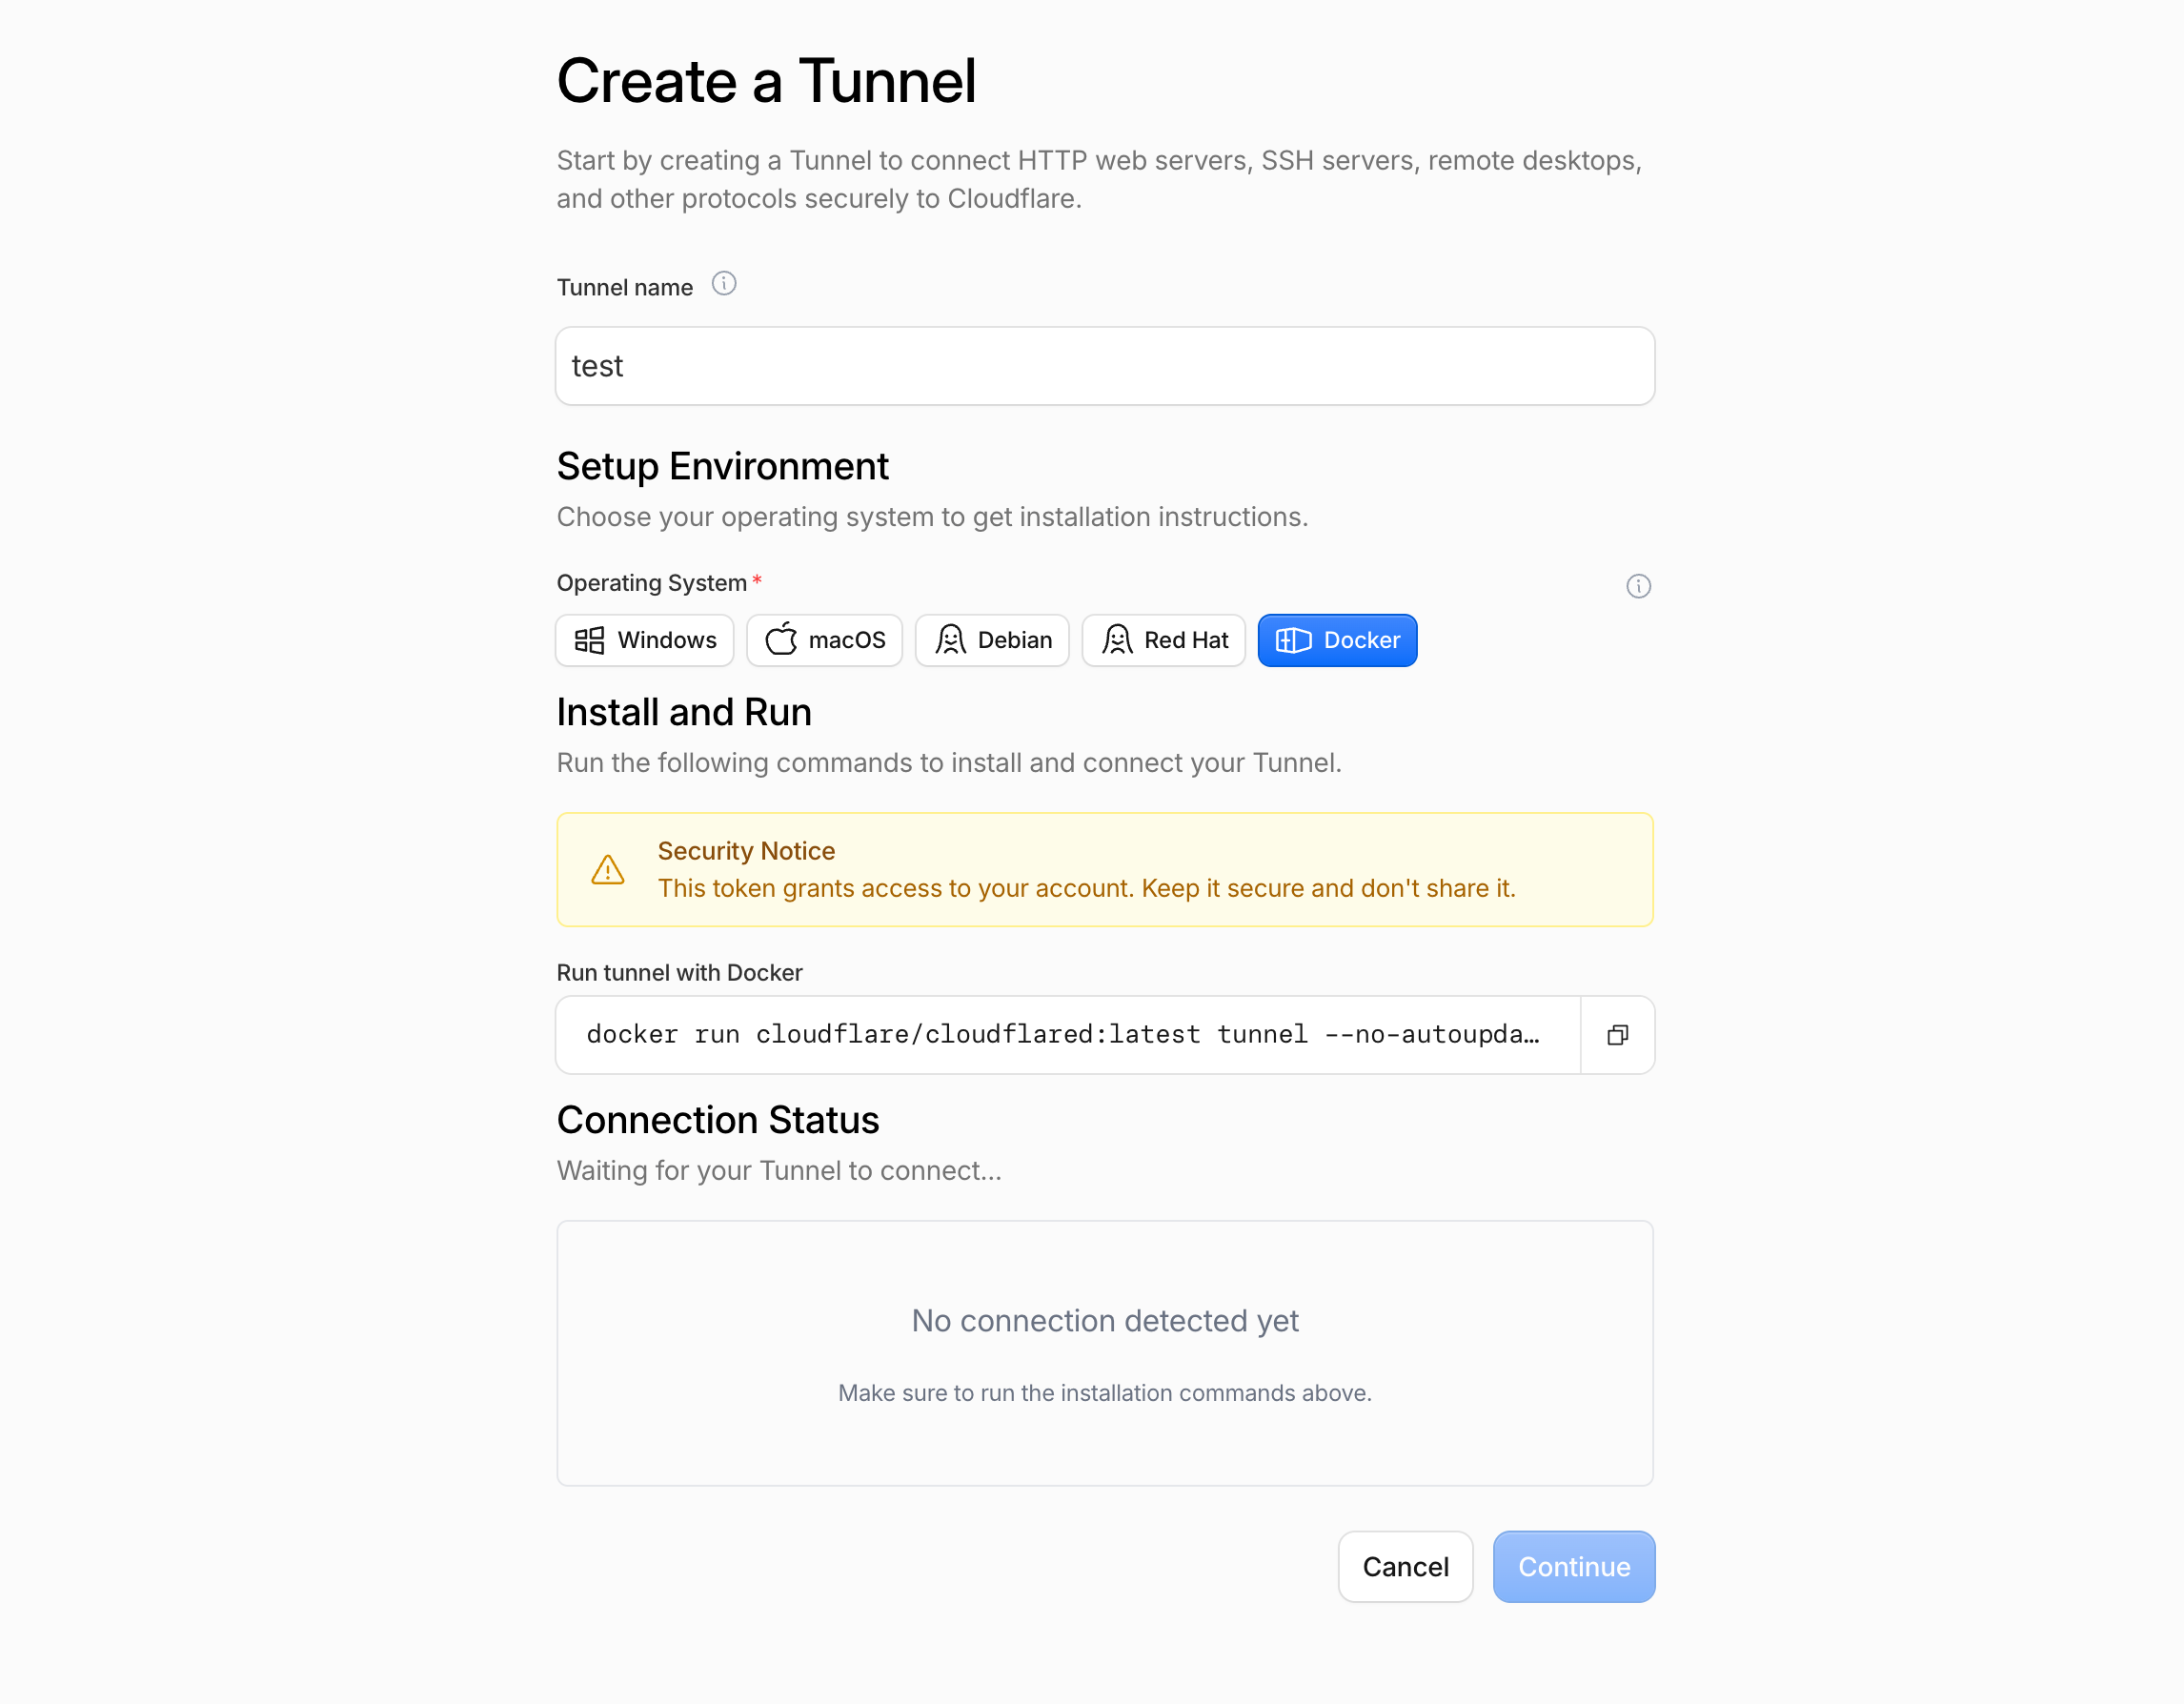
Copy the token at the end of the provided docker run command. Then on your NAS, deploy this stack:
|
|
After that, the Connection Status on the web interface will turn green. Open the newly created tunnel in Cloudflare dashboard and click Add route, then Published application. Enter your desired subdomain and the local URL of your service.
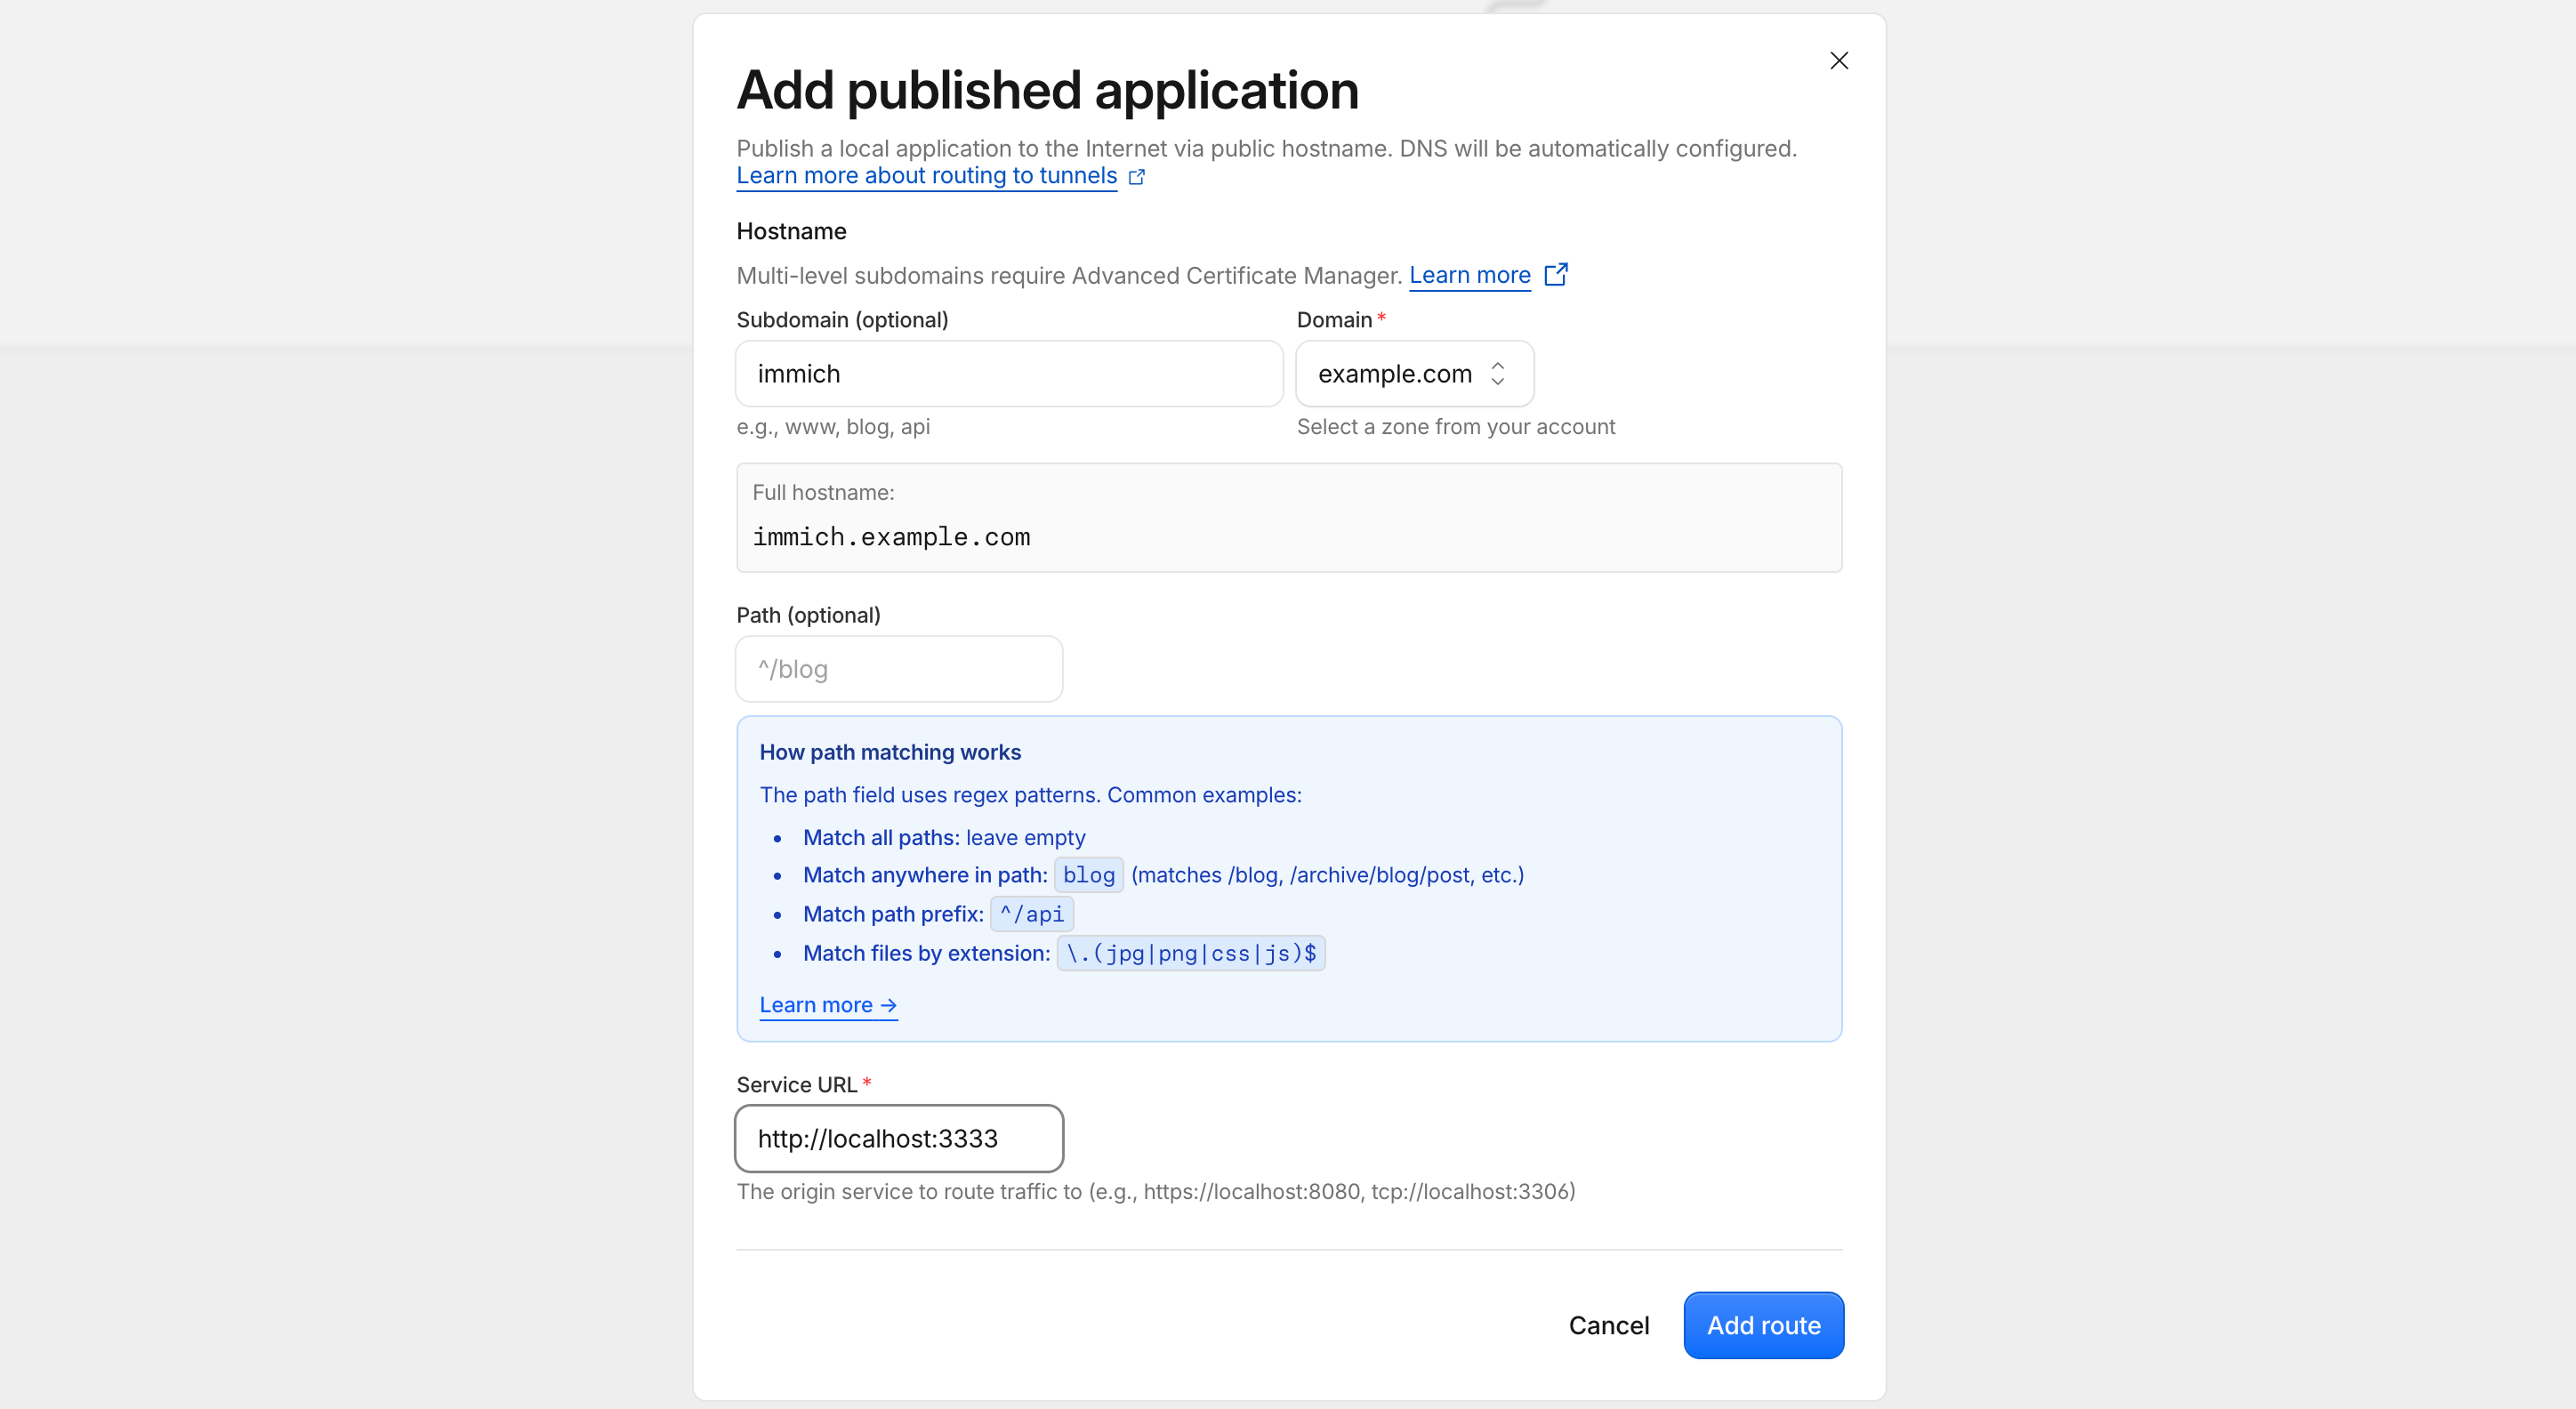
Now the service is publicly accessible at https://immich.example.com.